
Manage your contacts
Keep each customer's details, notes, files, reminders and deals on one page.
A contact is a person or company your firm works with: a client, a prospect, someone at a supplier. Each contact has one page with their details, notes, files, reminders, activities and deals. Colleagues who can see the contact work from that same page.
You need the Contacts permission to see contacts.
Key ideas#
| Term | What it means |
|---|---|
| Contact | Your firm's record of a person or company. Only staff see it. |
| Organisation | A company registered in the system. Invoices, proposals and tickets can belong to it. A contact can be linked to one or more organisations under Linked Organizations. |
| User | A customer's login to your client portal. A contact can be linked to one user under Linked User. |
| Manager | The colleague responsible for the contact. At first, whoever created it. |
| Contact group | A set of contacts shared with chosen colleagues. A contact belongs to one group at most. |
| Status | Where you stand with the contact: Draft, Not Contacted, Contacted, Qualified, Unqualified or Other. |
Contacts, organisations and users are separate records. Link a contact to an organisation and the system fills in its company name and keeps it up to date. Link a user and it does the same for the name and email.
You see a contact if you are its manager, or if it sits in a contact group shared with you. Super admins see every contact.
Add a contact#
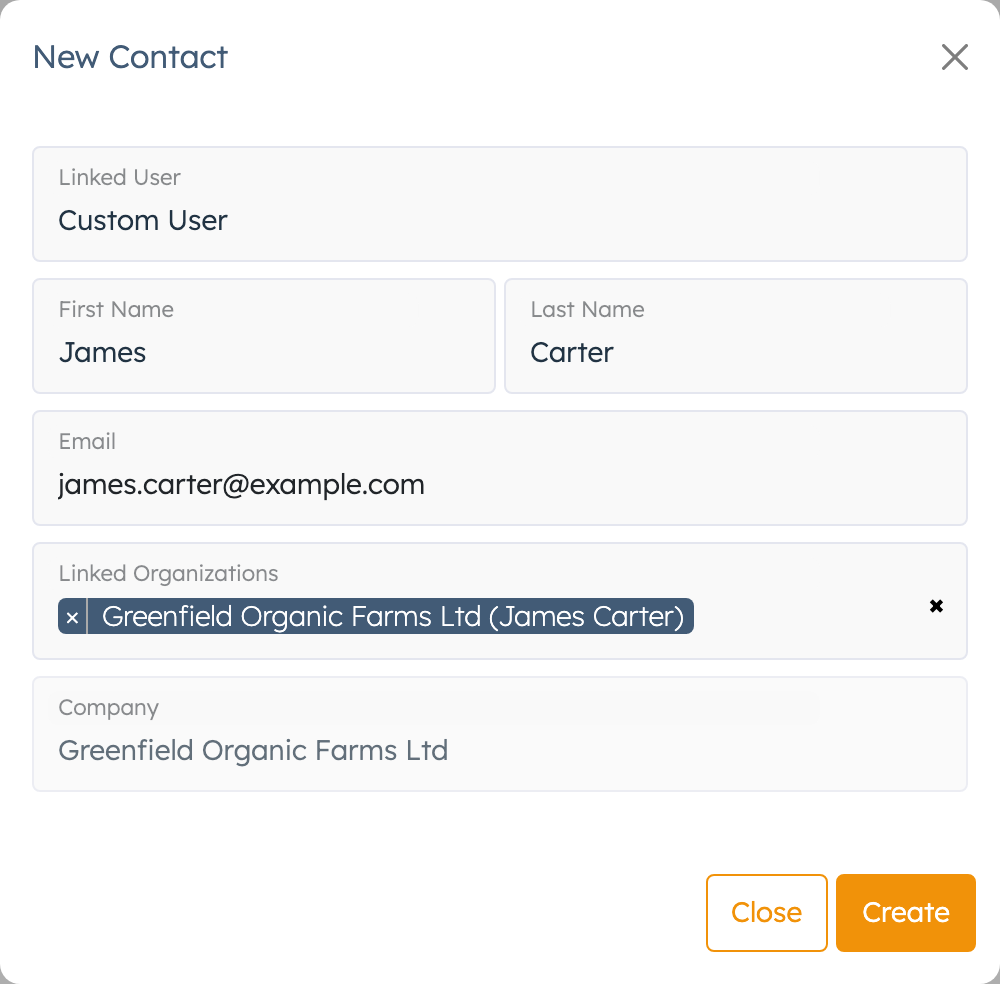
- Go to CRM > Contacts and click Create New.
- Fill in First Name, Last Name or Company. One of the three is enough.
- Add the Email.
- If the customer already has a portal login, pick it under Linked User. The name and email fill in from the user. Leave it on Custom User otherwise.
- If the contact works for a company that is already in the system, pick it under Linked Organizations. Pick one here and add any others later on the contact page.
- Click Create.
The new contact appears at the top of the list, with you as manager and the status Not Contacted. Open it to add a phone number, tags and the rest.
Find a contact#
The list opens with the contacts you manage. To see everyone you have access to, set Manager to All.
- Type in Name or Company. The list updates as you type.
- Open Filters to add more: eMail, Phone, Mobile, Status, Group, Organization, Tags and your firm's own fields. Pick a filter again to remove it.
- Clear Filters resets the list.
- Click a column heading such as Name or Last Updated to sort.
- Click any row to open the contact. The eye icon opens a quick preview on the right, where you can also edit the main details.
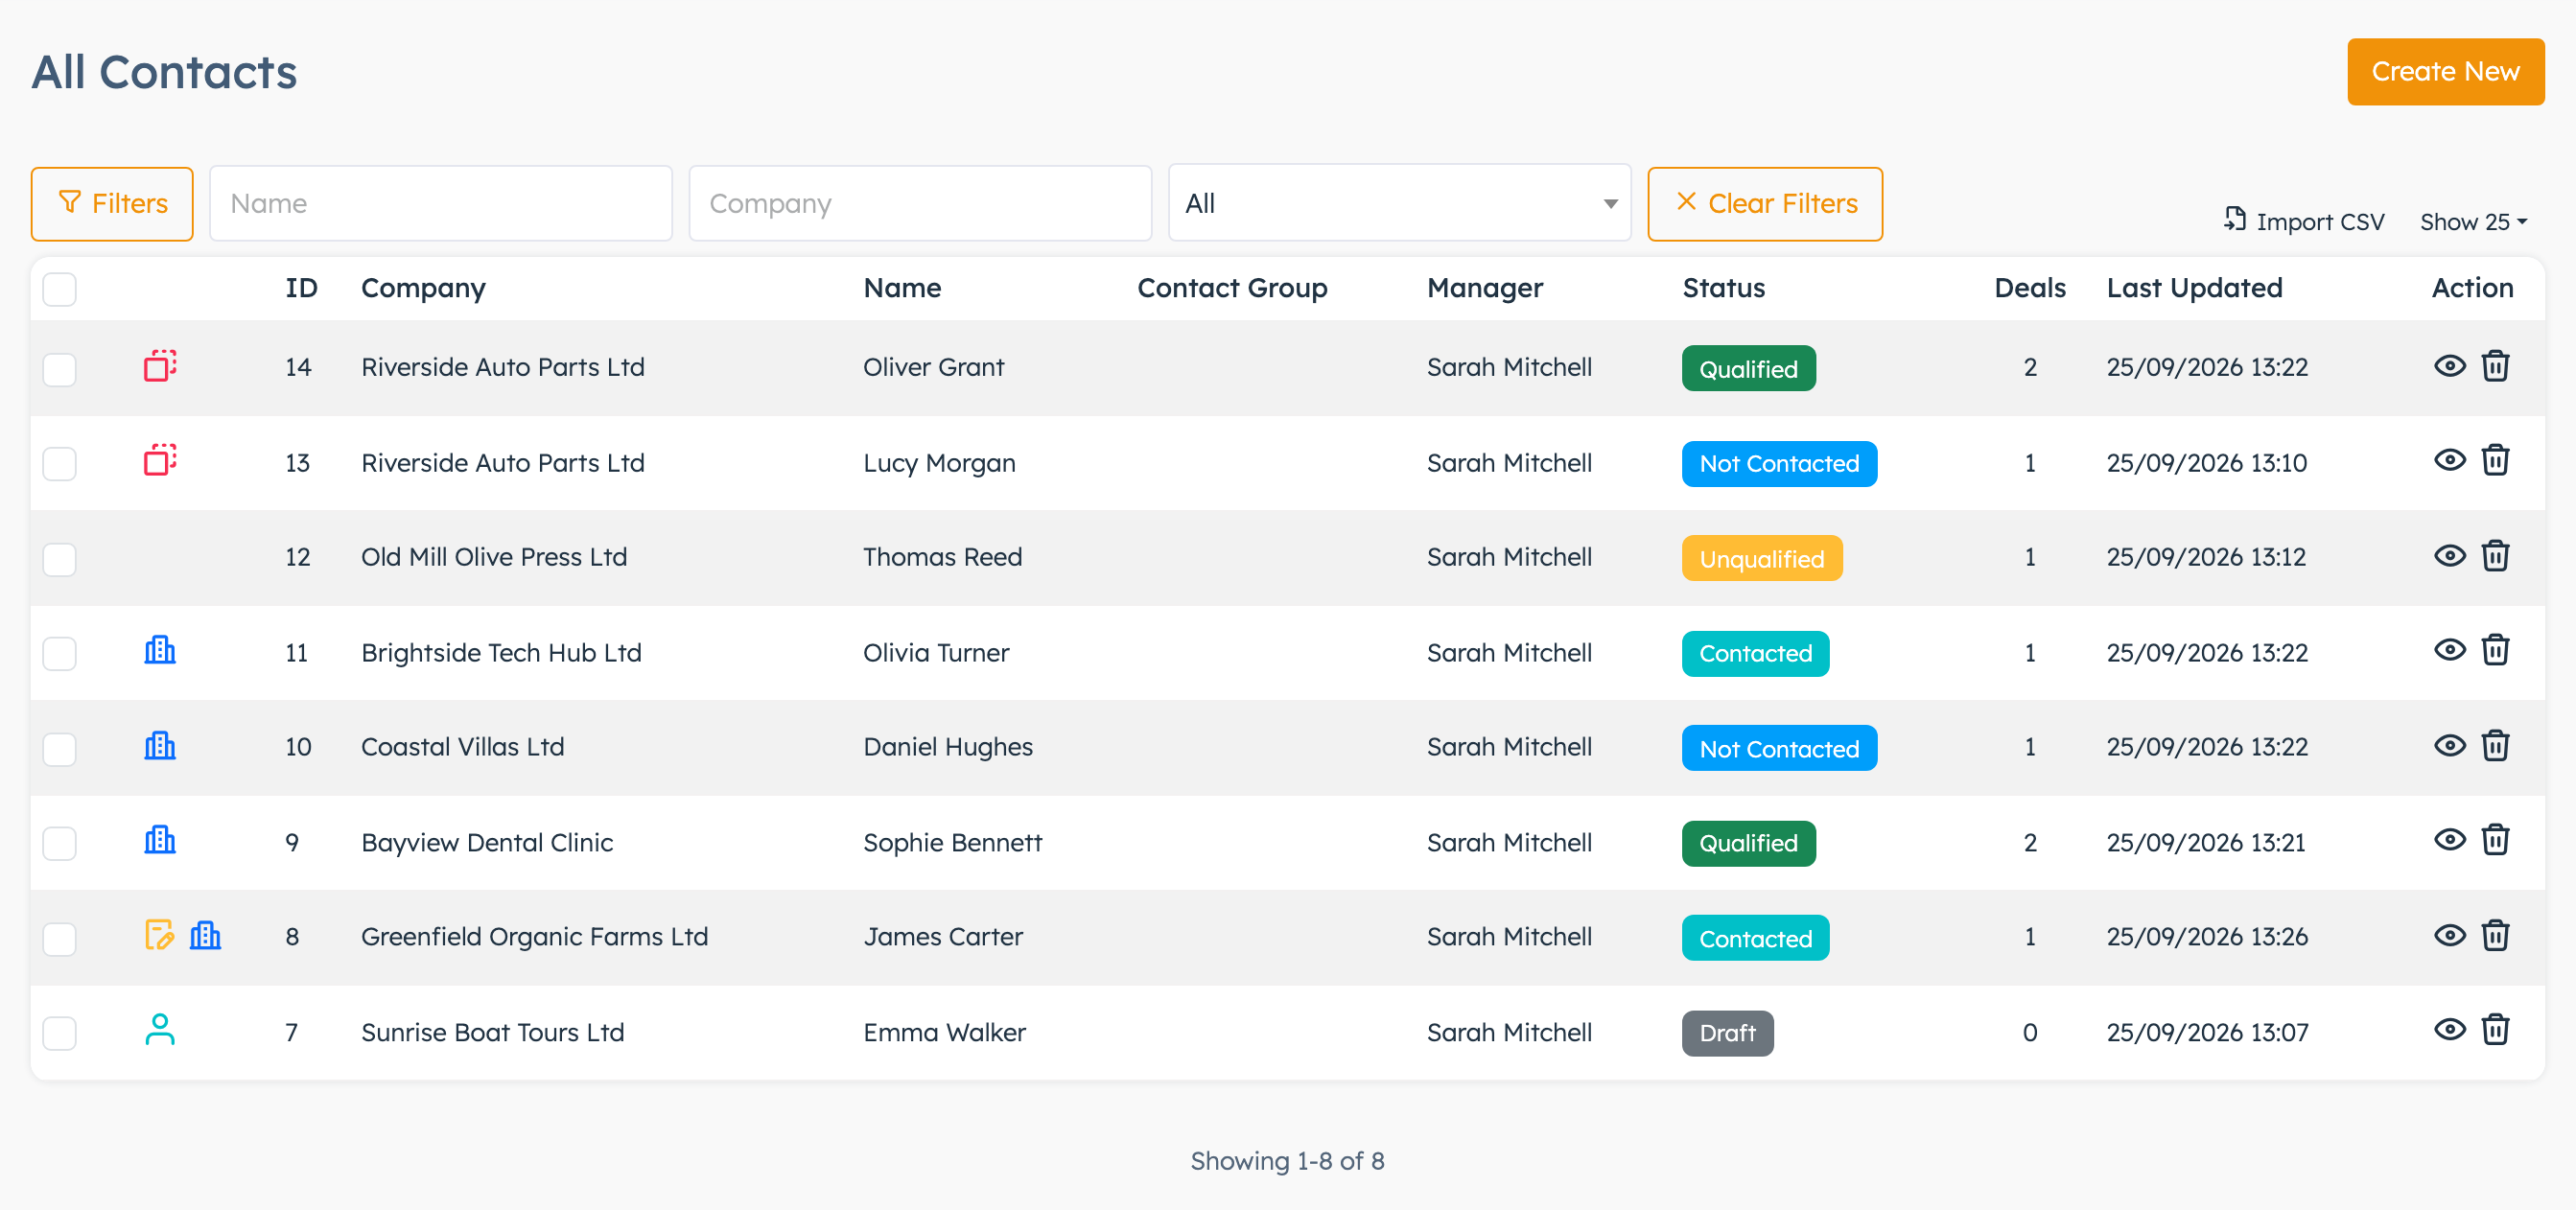
A red icon next to a contact means another contact has the same email. A yellow icon means it has a quick note: hover to read it.
Change many contacts at once#
Tick the contacts in the list (hold Shift to tick a range). A bar appears with these actions:
| Action | What it does |
|---|---|
| Update Status | Sets the same status on all of them. |
| Assign Manager | Makes one colleague the manager of all of them. |
| Add to Group | Moves them into a contact group, out of any group they were in. |
| Create User | Creates a portal login for each one. See Give a contact a portal login. |
| Delete | Deletes them. Read Delete a contact first. |
Delete a contact#
Click the bin icon on the contact's row and confirm.
The system deletes the contact and every deal it's on, as the main contact or as a participant, with those deals' notes, files and activities. You can't undo it. The contact's own notes, activities, files and reminders stay behind, even though the confirmation says they go too. To keep a deal, open it first and change its Contact, or remove this contact under Participants.
Work on the contact page#
The contact's details sit on the left under Contact Info and Company Info. There is no Save button: each field saves when you change it and click away.
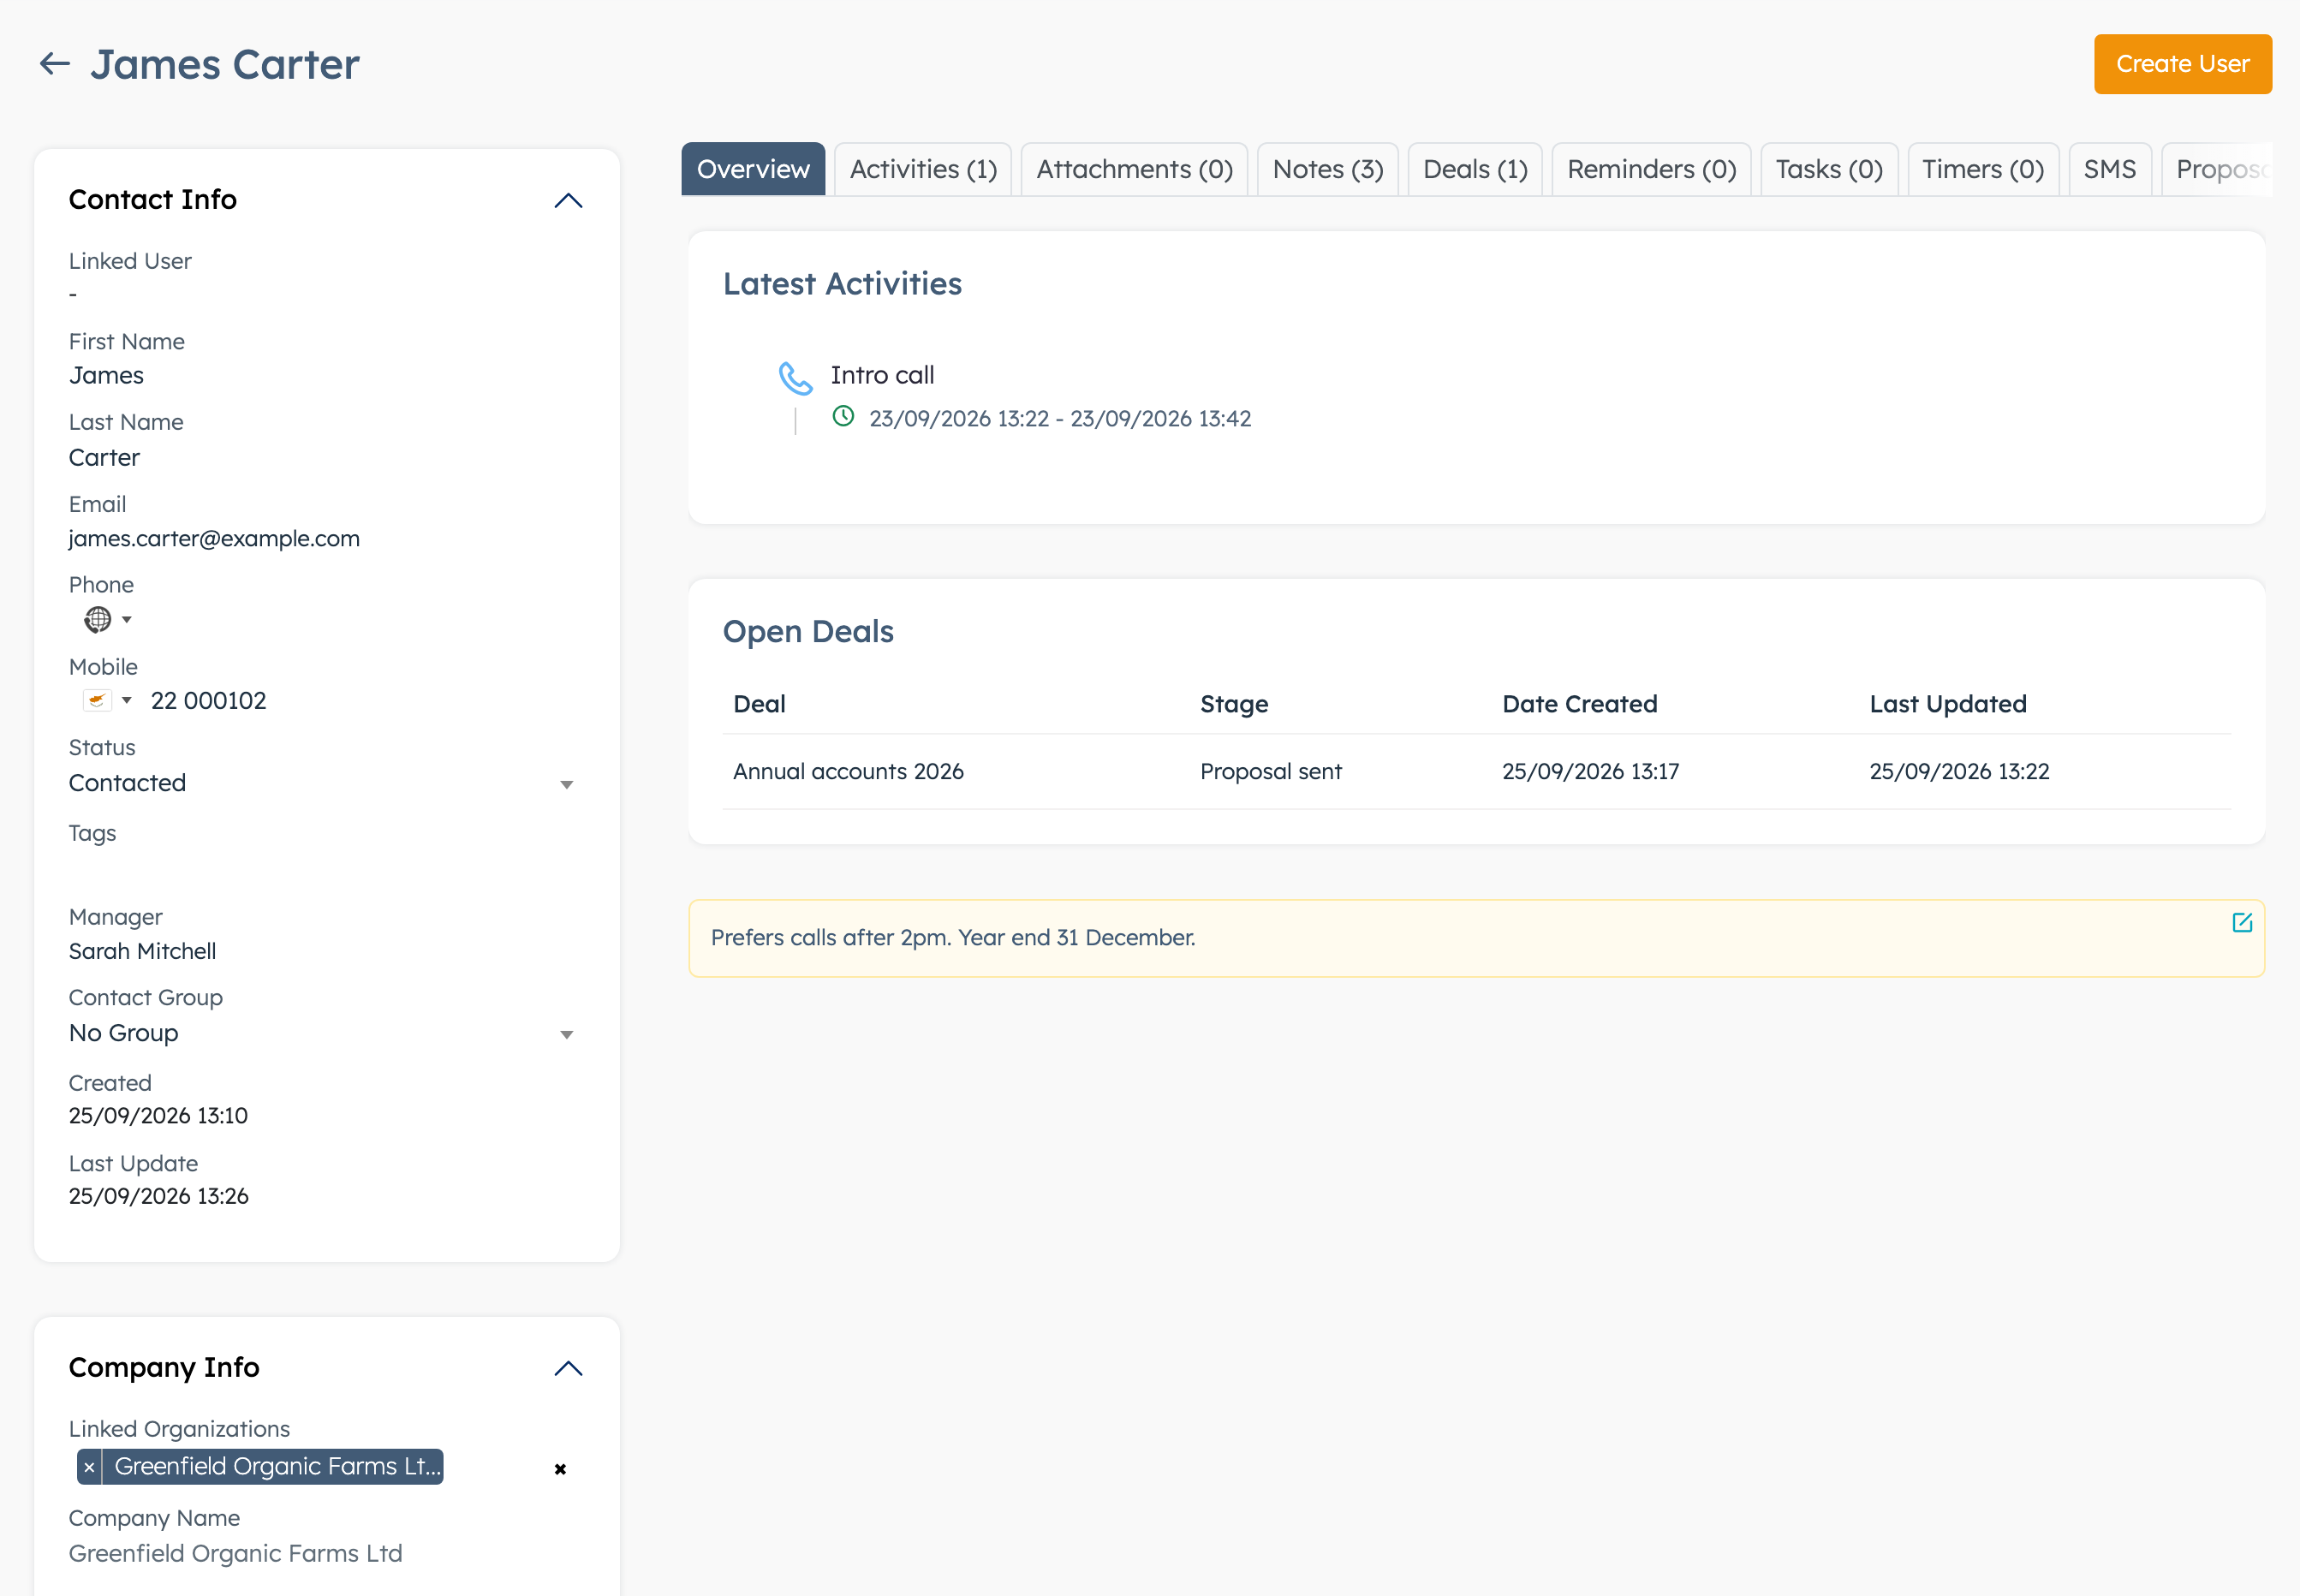
- Phone and Mobile need a valid number with its country, or the system won't save them.
- Tags: pick a tag or type a new one.
- Manager and Contact Group: hand the contact to someone else and you lose access, unless its group is shared with you.
- With a user linked, First Name, Last Name and Email are locked. Change them on the user's profile and the contact follows.
- With organisations linked, Company Name is locked to their names. Remove the organisations to type your own.
The tabs on the right hold everything else.
Notes#
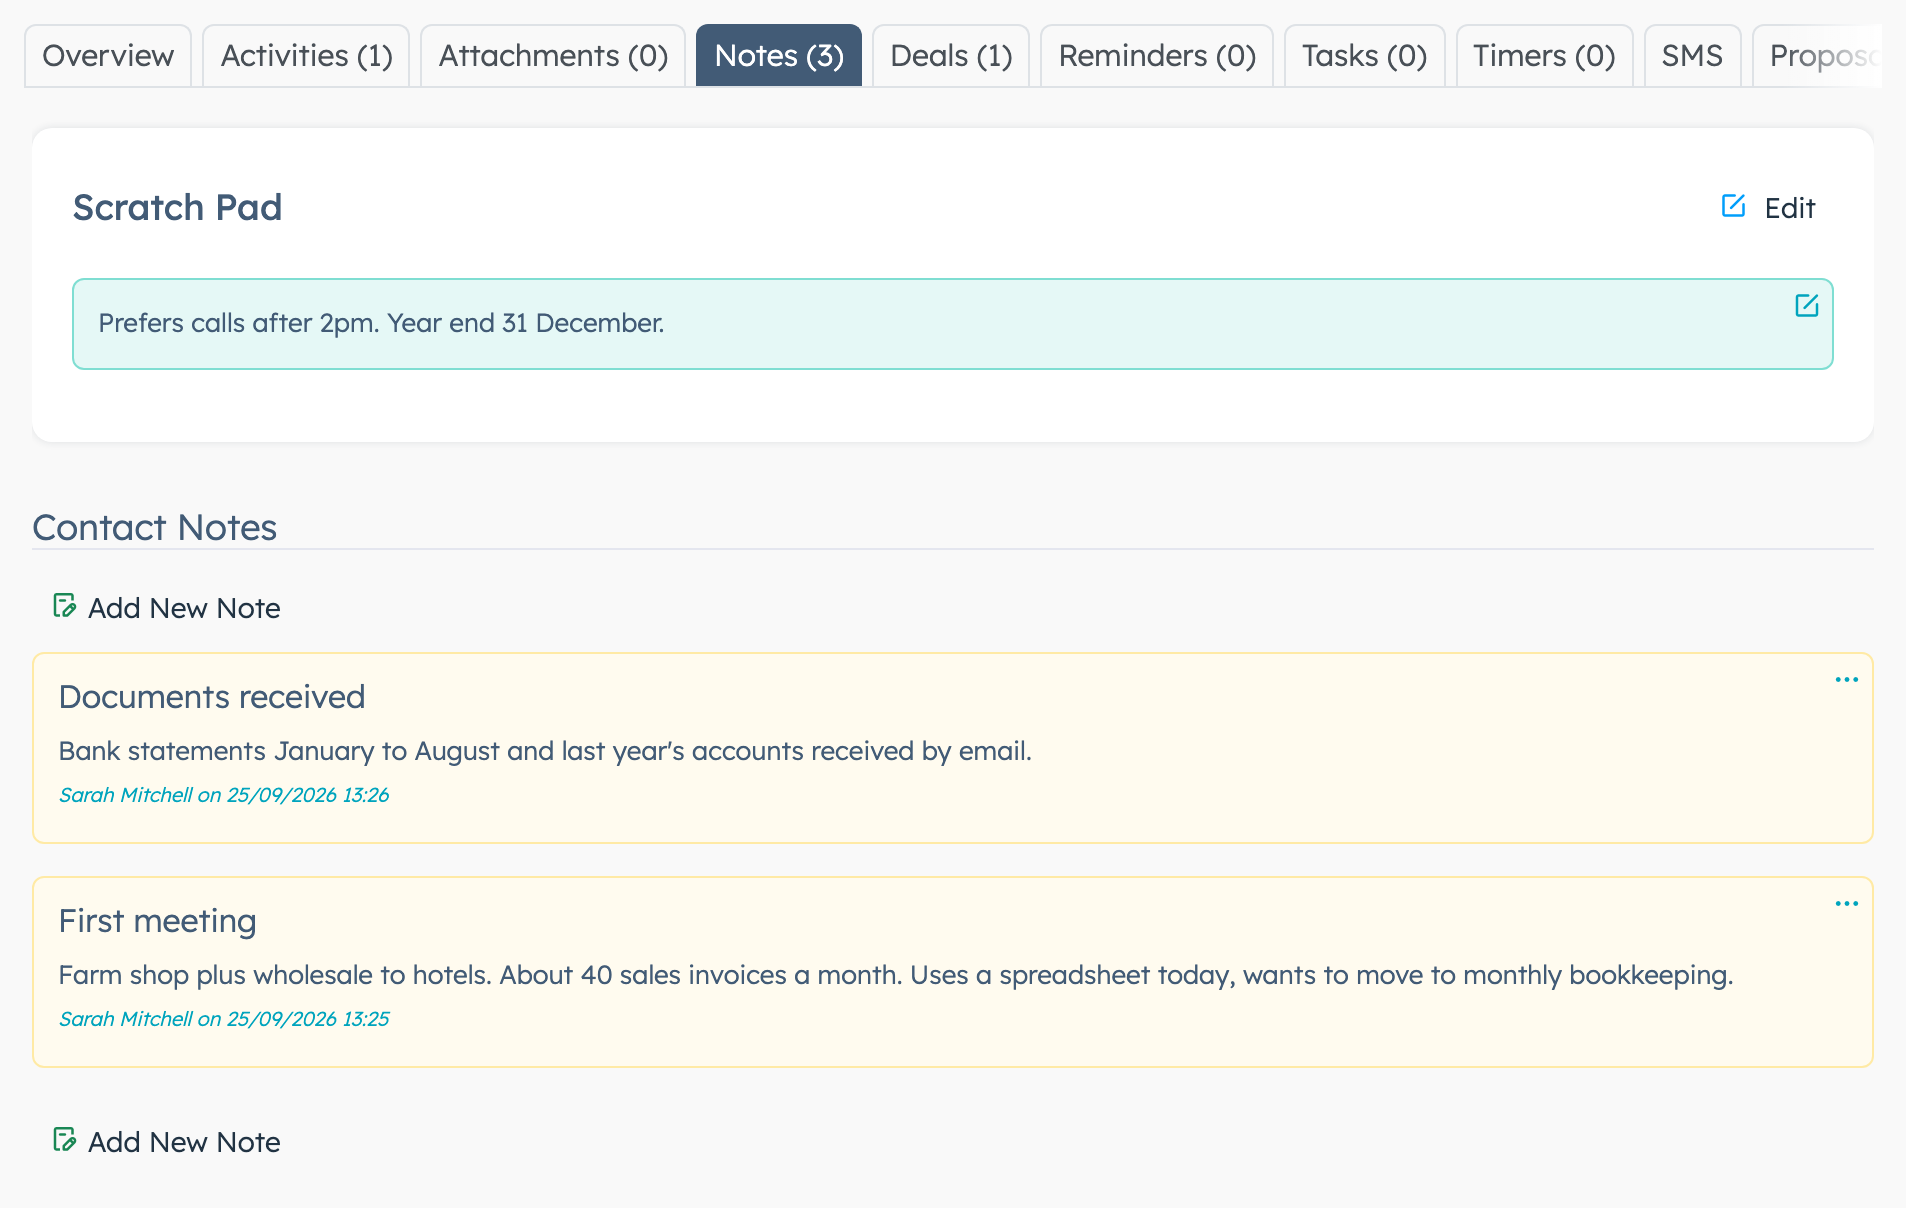
The Scratch Pad at the top is one short sticky note (up to 250 characters). Click Edit and type. It saves as you go. It also shows on Overview and as the yellow icon in the list.
For longer notes, click Add New Note, give it a Title, write the note and click Post. Under Reference you can tie the note to one of the contact's activities. Use the ... menu on a note to edit or delete it. An edited note moves to the top.
Attachments#
- Click Upload Attachment and pick one or more files.
- Add a Note if the file needs explaining.
- Click Upload.
Each file has buttons to download it, edit its note or delete it, plus a preview for images. Delete All Assets removes every file on the contact. File types, sizes and the number of files per upload are limited, see Settings explained.
Reminders#
A reminder nudges you, not the customer. Click Set Reminder, give it a Name and pick the date and time under Remind me on. If you see Notify by Email and Notify by SMS, switch on the ones you want. Otherwise the reminder comes by email. Click Save.
The system also adds a Reminder activity to the contact, which stays if you delete the reminder. All Reminders opens your full reminders list.
Tasks#
Click New Task (Create New on an empty tab), pick the board Section, type a Task Title and click Save. The task lives on that board and links back to this contact. You see your own tasks and any public ones.
Activities#
Activities are the calls, meetings and emails you log or plan for this contact. Click Log Activity to add one. Focus lists what's still open, History what's done. Tick the round box to mark an activity done. The system then opens a Follow-Up Activity panel. Close it if you don't need a follow-up. Activities explains every field.
Clear Activities deletes all of this contact's activities. It also deletes activities on other contacts and on deals that have this contact under Contacts in their Linking section. You can't undo it.
Deals#
Lists the deals where this contact is the main contact, a participant, or linked through its organisation. Click Create New, give the deal a Title and a Stage, and click Create. More in Deals.
Proposals#
Lists proposals for this contact, its user and its organisations. Click one to open it in a new browser tab. You need the Proposals permission to see this tab. More in Proposals.
Email#
Shows up if your firm uses Mail Flow and you have access to it. Pick the mailbox under Send From, add a Subject and message and click Send. The email goes to the contact's Email address.
The other tabs#
| Tab | What it shows |
|---|---|
| Overview | The latest 3 activities, up to 3 open deals and the scratch pad. |
| Timers | Time tracked against this contact. Start Timer starts your timer on it. |
| SMS | Send a text to the contact's Mobile and see past texts. Needs SMS set up. |
| Tickets | Support tickets from the contact's user and organisation. |
| Events | Book an appointment for the contact and see their bookings. Booking creates a portal login for a contact who has none. |
| Log | A history of changes to the contact: who changed what, and when. |
Your firm may also have tabs of its own fields. See Custom fields.
Give a contact a portal login#
Click Create User at the top of the contact page and then Yes. The button shows only while no user is linked. The contact needs a first name, last name and an email that no other user has.
The system creates the user with a random password and links it to the contact. The user gets the contact's manager as account manager, plus its phone, mobile and tags. The system sends nothing to the customer, so they need to reset their password before they can log in. The new user isn't added to the contact's organisations. Add them on the user's profile.
Share contacts with a contact group#
A group lets chosen colleagues see and work on a set of contacts.
- Go to CRM > Settings > Contacts Groups and click Create New.
- Type a Name and, if you want one, a Description.
- Under Contacts, pick the contacts.
- Under Accessible By, pick colleagues in Admins, or whole staff groups in Admin Groups.
- Click Save.
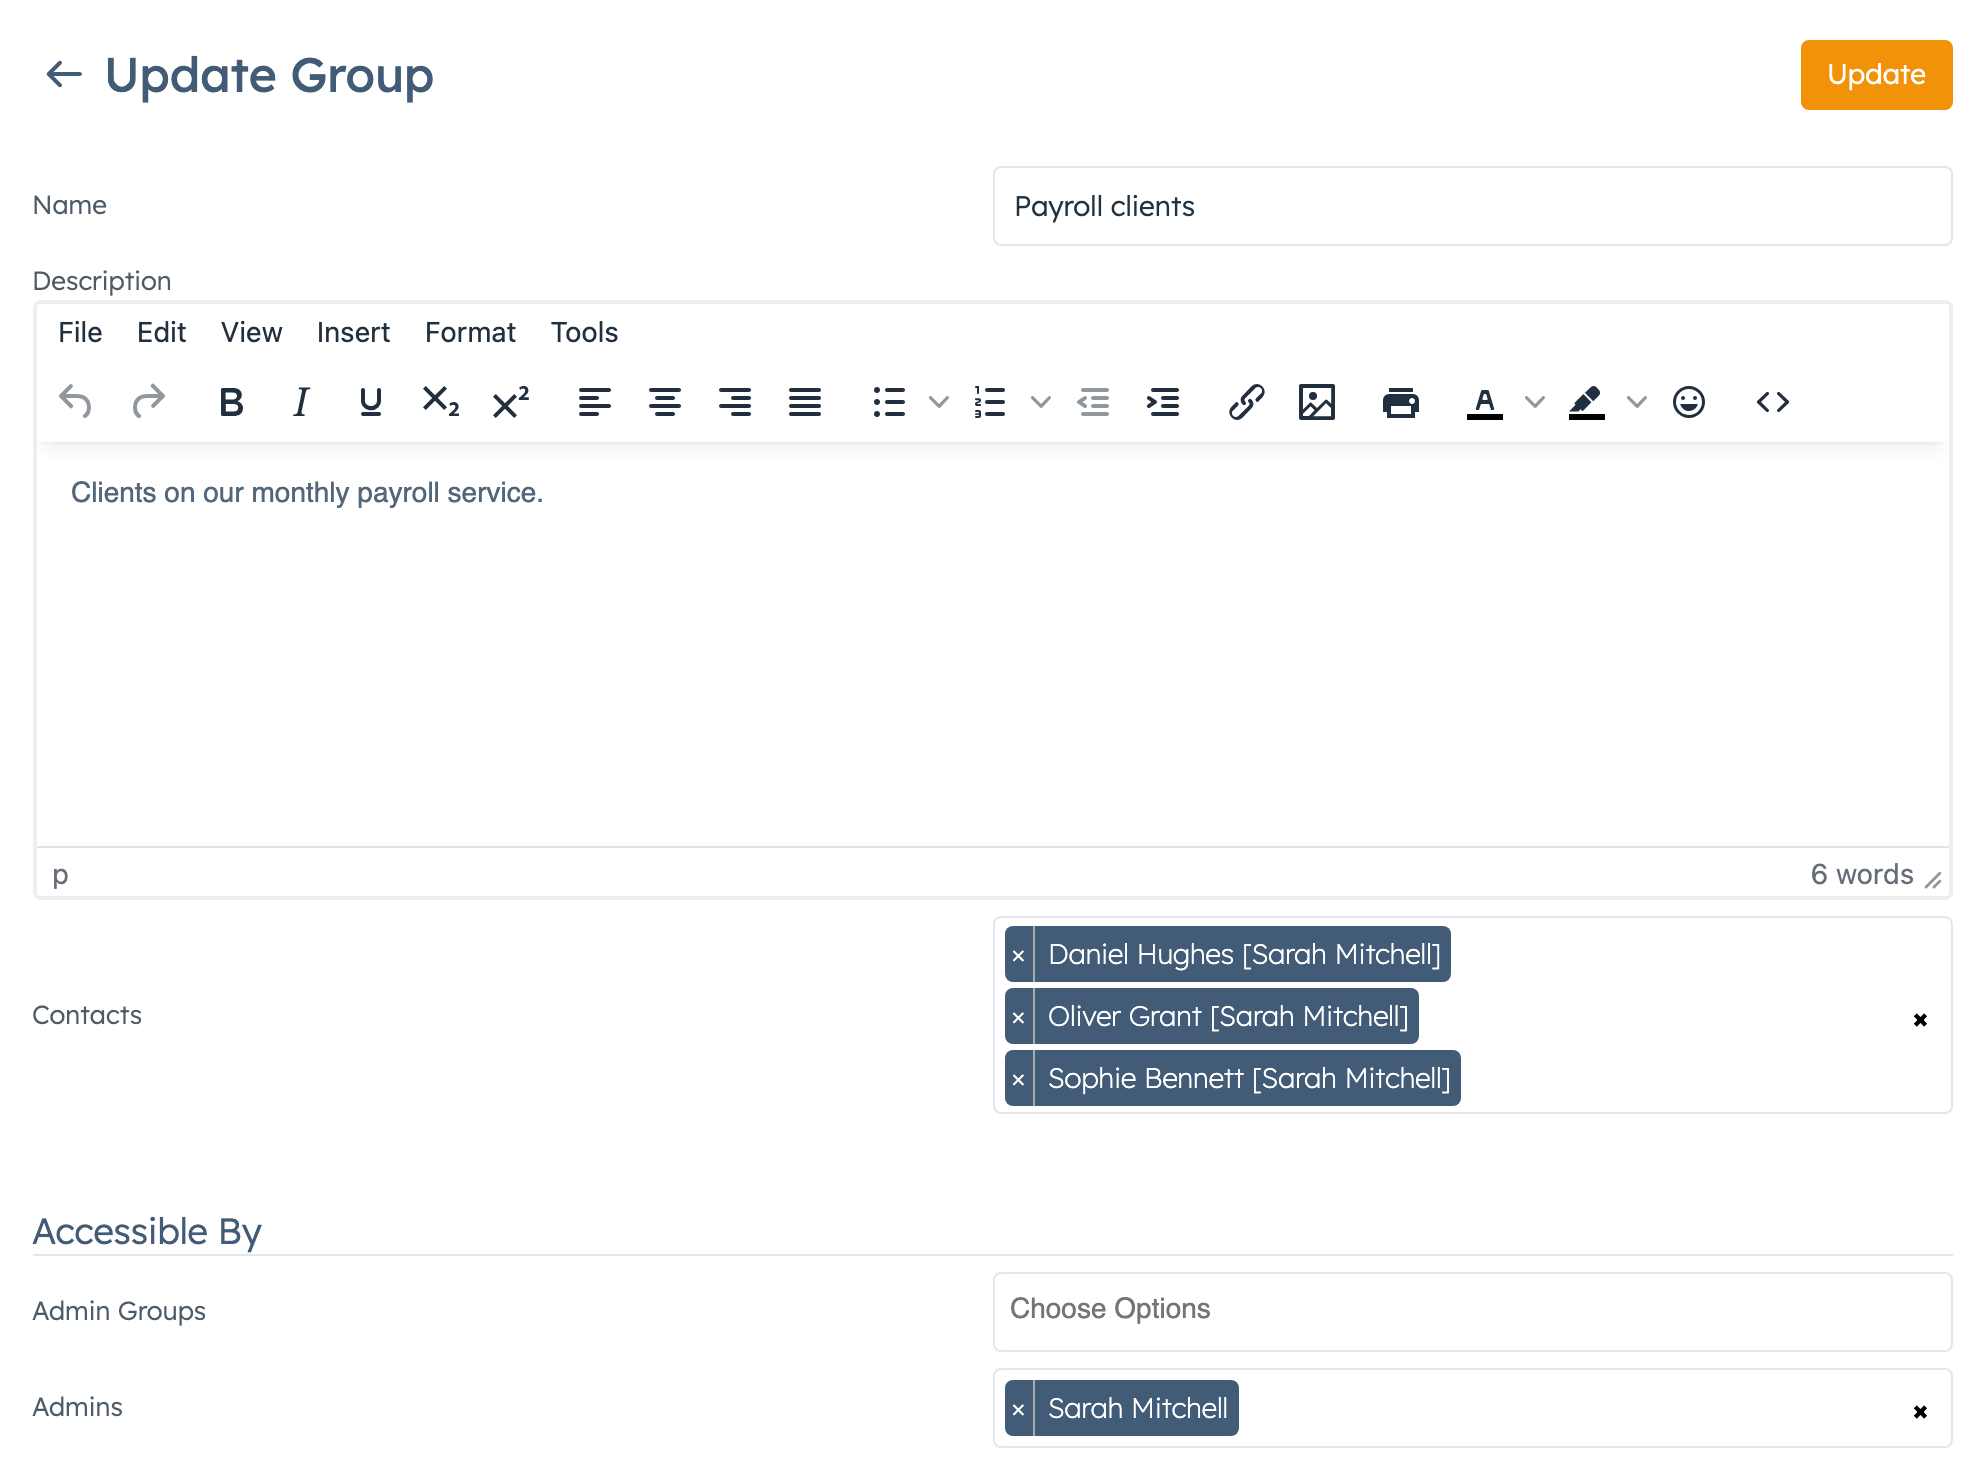
You need the Contact Groups permission. Adding a contact here moves it out of any other group. Deleting a group leaves its contacts in place.
To see the contacts a group shares with you, set Manager to All on the contacts list and pick that group in the Group filter.
Custom fields#
Your firm can add its own fields to contacts, such as a VAT number or year end. Your administrator creates them in the system's Custom Fields settings, with Available for including Contacts.
They show on the contact page under Company Info, or on their own tab if the field group has Display Separately switched on. You can filter the list by most of them.
Import contacts from a spreadsheet#
- In Excel, give the first row these headings:
fname,lname,email,phone,mobile,company,tags. Leave out the ones you don't need. Usenameinstead offnameandlnameto have the system split a full name at the first space. - Save as CSV UTF-8 (Comma delimited).
- In CRM > Contacts, click Import CSV.
- Drop the file in the box and click Upload.
Put several tags in one cell, separated by commas. The page reloads with the new contacts, with you as manager and the status Not Contacted.
The import skips rows with no first name and doesn't tell you, so company-only rows won't come in. Check the count against your file.
Find and remove duplicates#
Go to CRM > Settings > Duplicate Contacts. The page groups contacts that share the same email and the same first and last name. You need the Duplicate Contacts permission.
- To remove copies, tick them and click Delete Selected. This is a full delete, as in Delete a contact. Reload the page to see the result.
- If the contacts are different people, click Ignore. This clears the red duplicate icon on them in the contacts list. The group stays on this page while they share a name and email.
The red icon in the list works on email alone, so the list can show more duplicates than this page.
Settings explained#
These sit on the Upload Settings page, tab CRM, section Contacts. To open it, click Upload Settings on a contact's Attachments tab. You see that link if you have the Edit site settings permission. Change the values and click Update.
| Setting | What it does | When to change it |
|---|---|---|
| Attachment file size limit (MB) | The largest file you can upload. Default 2 MB. The label shows your server's maximum. | Scanned documents are often bigger. Raise it if uploads fail. |
| Attachments limit for each contact | The most files the system takes from one upload. It skips the rest without a message. Default 2. There is no limit on the total per contact. | Raise it if staff upload several files at once. |
| Allowed Attachments Types | The file types you can upload. Default png, jpg, gif, webp and pdf. | Add docx or xlsx if you keep Word or Excel files on contacts. |
Good to know#
- Contacts created from a lead start as Draft. Draft contacts don't appear in the contact picker on activity and deal forms. Change the status to fix that.
- Give files distinct names. If another contact already has a file called, say,
passport.pdf, a newpassport.pdfdoesn't show up in the list. On the same contact, it replaces the old file. - An organisation's page has a Contacts tab listing the contacts linked to it.
Related guides#
- Leads: turn an enquiry into a contact
- Deals
- Activities
- Proposals
- CRM overview